Saturday 30 March 2013

Scrapbook Saturday
This Saturday my scrapbook layout uses the rosettes like the ones made in the technique class. The papers are Boy Crazy from My Minds Eye. It only uses two pieces of paper and a title from a third piece. The sentiment was from the manufacturers strip. I then used kindy glitz to highlight some of the words.


Friday 29 March 2013

Welcome to today's 5 minute Friday.

Today I have made a book mark using the rosettes I made yesterday.
From my scrap box I cut a peice of white card approx 3" x 8". I used the corner rounder punch on the corners.
I added 2 stripes of Teresa Collins paper on one side again I used the corner rounder.
On the other side I attached a stripe of ribbon to a piece of black paper, taking the ribbon around the back of the paper by approx 1"before attaching it to the card stock.
I cut 2 circles from scrap card stock and attached them to the top of the bookmark so that 1/2 of the circle protrudes outwards.
The Rosettes were attached to these circles on either side of the bookmark.
Using a pink +Copic I coloured some white basic grey sticky letters and attached them to one side of the bookmark.
I came up with "Books are a passport to adventure" for my title. Lastly I used my glossy accents over the letters to add some shine and some kindy klitz to the edge & middle of the rosette to add some bling.


Thursday 28 March 2013

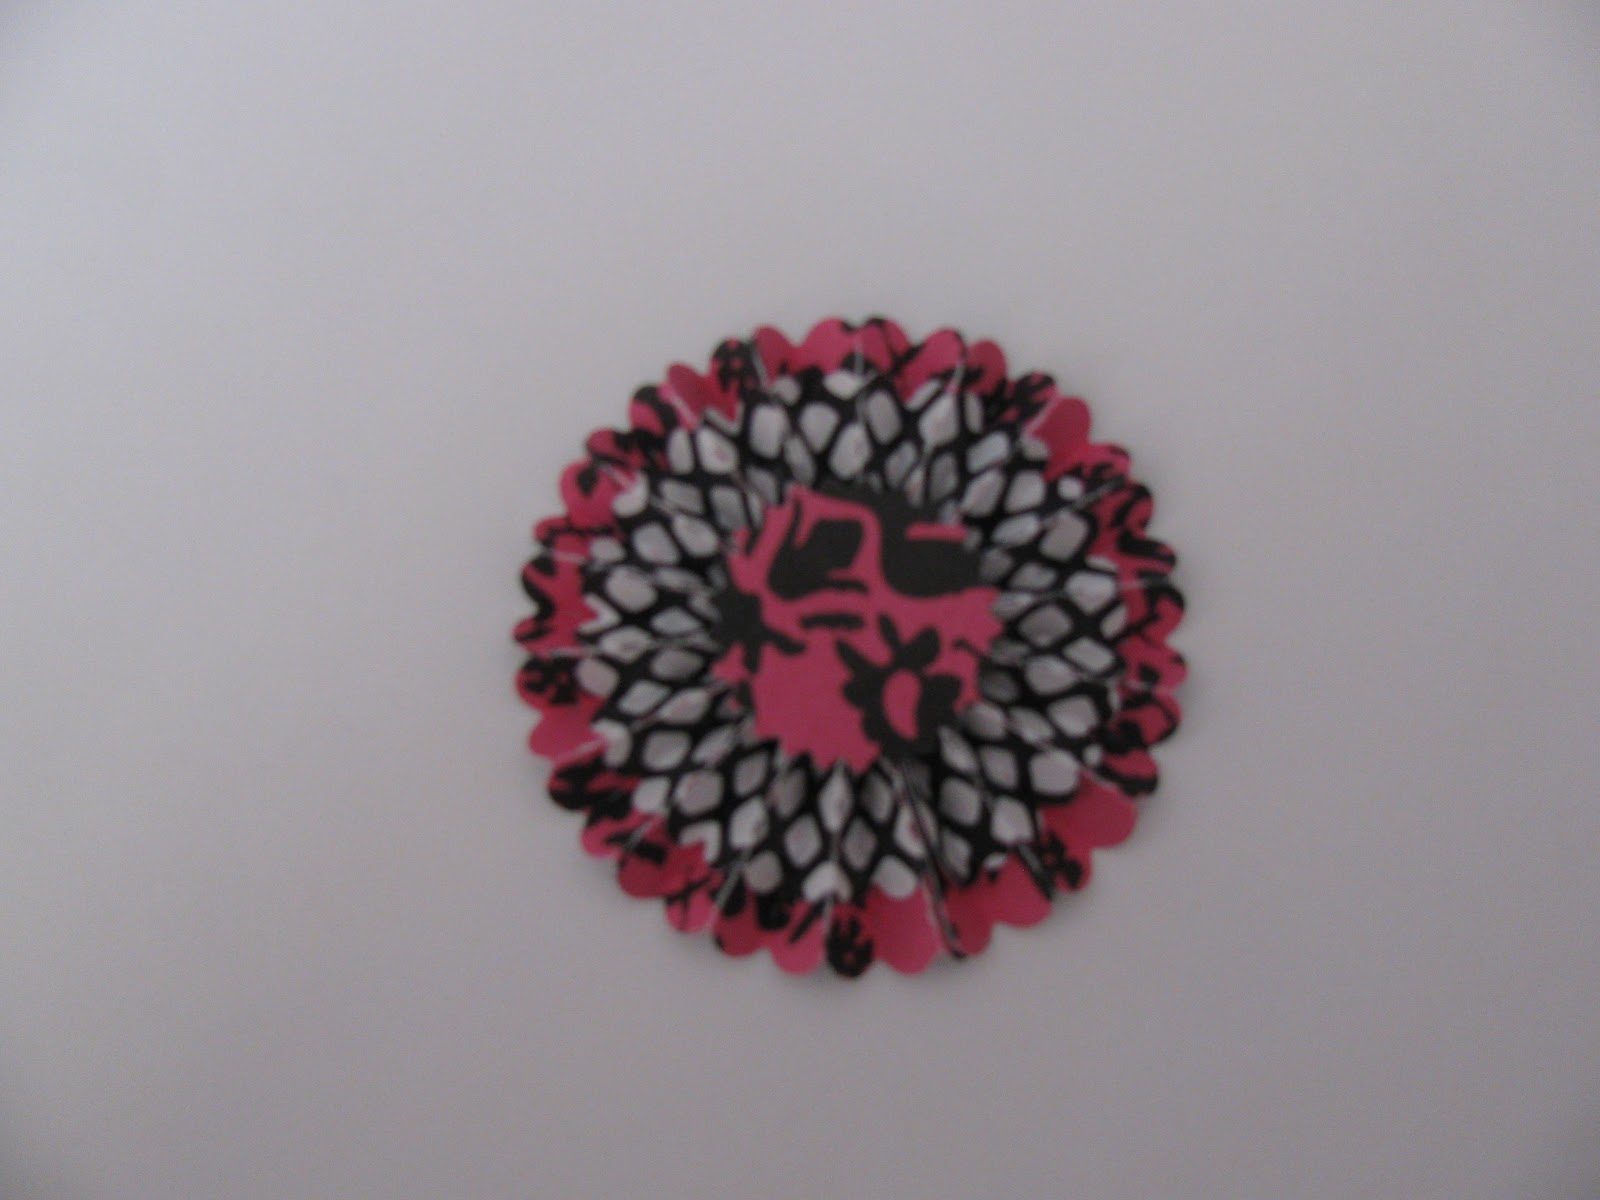
Today's Technique Thursday is making rosettes using the +Tim Holtz die on the Sizzix or the Cuttlebug.


I have used paper from Teresa Collins
 
Place the white block, clear plate, die, paper and then second clear plate into a multi layered sandwich.
Pass through the sizzix by turning the handle and you should have a perforated stripe ready to use.
 
 
The die I have used makes a small rosette and a medium rosette.
  
Choose a strip and start to fold along the perforated lines, use the very tacky tape (red) to attach the 2 ends together to form a collar. Using a 1" circle punch cut out a circle from scrap card. Cover this with red double sided tape.
You will notice one edge of the stripe is scalloped and one edge straight. The scalloped edge is the outside edge. Stand the collar on its side, scalloped side down. push the straight edge sides down in the middle and the scalloped edge should slide outwards and form the rosette.
Lift it straight onto the pre taped circle of scrap card and hold down.
The Die also cuts out a small circle, put double sided tape on to one side and place in the centre on the top of the rosette. It looks good if  you use the alternative side.
Here are the completed rosettes.
In the photo below I have used both sizes of rosette to make one.
The medium size one is 2 perforation's longer than the smaller one so these 2 need to be cut off.
There are 2 ways of doing this, the first way is to make the rosettes separately and then make the larger one as the technique above but before adding the last circle, push the small rosette down on the top, then attach the top circle. The second way is to attach the smaller one on top of the larger one after folding the perforations, then attach the ends to form a collar and then continue with the technique of attaching the whole thing to the scrap circle and attaching the top circle.


Tuesday 26 March 2013

Workshop Wednesday
Using the paper piecing method I have made a picture for my cousins baby Thatcher.
To make the train you need 4 hearts for carriages , 10 circles for wheels  10 small circles for wheels, 1 larger wheel circle and 3 small hearts for wheel, train and smoke stack, and some clouds. I hand cut the train and its little roof. I have included the picture before and after the pen stitch to show how it defines the pieces.


Monday 25 March 2013

Tuesday Tag
I made a different shaped bunny and made him look fluffy with white and pink flower soft. The tag I inked using +Tim Holtz distress inks. I then stamped a floral background. I over stamped the same background and embossed with sparkly silver. I stamped the Happy Easter and added glitter then added a glitter border. I coloured the ribbon with +Copic  to match.
Tip: buy white ribbon in bulk and then colour to match what you do with copic markers, ink, alcohol ink etc. Then you get a perfect colour match.


Saturday 23 March 2013

Make a Card Monday
I have made a card using the bunny from Thursdays post. This time I made him look fluffy with sparkle fluff. The grass was cut out on the cricut then some bling added. The sentiment printed out on the computer, inked and then added to a tooth pick. I made an extra bunny to add to the inside of the card as a pop-up and then a sentiment stamped inside.

A random blog for Sunday. An Easter Bunny of my daughter. Cute as. She even has a cotton tail.

Saturday Scrapbook Layout

Today I have made a simple page layout using Graphic 45 papers from "Little Darlings" and "Once upon a springtime" collections,
I used:-  Little Treasures
              Rock A Bye
              Cherished
              Kewpie Cute
              Primrose Cottage

The Primrose cottage was used as my background paper. Cut the green frame from Kewpie Cute. Punch a nice fancy edge along the top of a 4" x 12" strip of Cherished, then cut another 1" strip of Cherished and punched along one edge. Cut two 1" strip of Rock A Bye and border punched along the edge of each of them. Layer up all four fancy edges and then attach the to the bottom of the layout approx 1/2 " up from the bottom edge. Then attach the frame. I have done mine so it sits flat on my page but it would also look good if it were raised using foam mounting tape. The photo was double mounted on Little Treasures and the Ivy Bazzil card stock. The flower spray is Prima. The "Hoppy Easter" is cut on the Cricut using the Celebrate with Fourish cartridge (Thanks to Pauline for the loan). Finish off by hiding 3 paper pieced bunnies, from Wednesday, in the flower spray. The punch I used was one of Fiskars.


Thursday 21 March 2013

Today is Five Minute Friday.

I made 2 white rabbits, using the paper piercing technique from yesterday. I cut 12 banner flags (6 yellow and 6 white) on the cricut using Lyrical Letters cartridge. Using Pooh font I cut the words Happy Easter from pale blue and pink card stock and attched to the banners using my Xyron. I attached the white rabbits and threaded the banners using some lovely ribbon.


Now all you need is a nice place to hang your banner and you are all set for Easter Weekend.

Wednesday 20 March 2013

Technique Thursday

Today's post looks at paper piecing. A fun technique and great to do with children as it is very economical. To make the Bunny I used a heart punch, hole punch and tiny flower punch. Cut 3 of the hearts in half and assemble as shown in picture. To make it easier for children you can draw a template around a bunny you have made for them to copy. If you draw your template on transparency it wont stick as they glue it.
 I also drew stitch lines around outside of bunny as it defines the shape and makes it stand out more.

The picture shows what pieces I used, a completed bunny and a template to copy.

Don't forget to log in tomorrow to see what you can use this technique for and how you can develop this idea.

Tuesday 19 March 2013

Creating a Frame

Back again. Our first Creative post is a layout recently published in NZ Paper Chase, a New Zealand scrapbook magazine.
For the layout I use my Cricut Ornamental Iron cartridge to cut out the ornamental frame. I then put it on a piece of card stock and sprayed with Perfect Pearls.( I put it on card stock so I could use the frame as a mask, for a background on another layout. Don't want to waste my perfect pearls.) I then raised up the frame to create dimension, mounted a photo of my gorgeous daughter in the middle, added the Prima flowers and  Kaisercraft sentiment on card. Inked the edges.
Hope you like it. I was so pleased to have it published.

Welcome to Our First Blog

Hi, we are Kathy and Sue. Two friends addicted to craft. We would like to share our addiction/passion with you, other crafting crazies. We live in beautiful New Zealand and met 6 years ago, surprisingly enough, at a craft class, and have been friends ever since. We like card making, scrapbooking, off the page projects and generally changing junky items into beautiful objects. We have different styles so hopefully there will be something of interest for all crafters.
We would like our blog to be about all things craft and not about what we had for dinner. So join us on our journey into sharing our craft with ideas, projects, hints and tips.
So far our claim to fame was meeting Tim Holtz in his class in Brisbane last year. A truely inspirational day.