Today I'm going to show some of the layouts that I have been doing for my holiday scrapbook. The holiday was in Apr 2011 and my family went to England for 6 weeks, we spent time with family, friends and visited Rome, Copenhagen, London and Lisbon whilst we were on that side of the world.
As you can imagine I came back with far too many photos but I have managed to sort them out and scrapbooked nearly everything we got up to. Quite a task, hence here I am in Sept 2013, 3 scrapbooks nearly full and I still have a few pages to go. I should say I have done other things crafty too and have completed an 8 x 8 album for my sister also on our time spent together. As I have had so many pages to do, each layout is quite simple, as I said I'm already up to my 3rd scrapbook and I find that using too many bulky layouts, not only fill them up quicker but also the embellishments push into the others pages near them and can spoil them.
So here are some of my pages:-
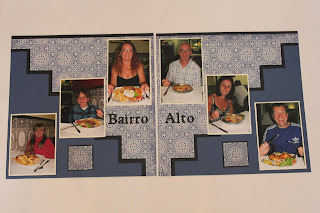
This first one is a really easy LO, I fell in love with the paper as it reminds me of the tiles you see all over Portugal. I didn't want to cover too much of it up and so have just added the ribbon to embellish the page.
Another example of a LO using just one page, this one I have cut along the flowers with a craft knife to insert the photo behind them a little. I've added a doily for a textured embellishment.
This example is a double page that I did in my sisters 8 X 8 album. I created a frame and used double sided foam tape. then cut out embellishments from the rest of the paper.
When organising pages I quite often print lots of photos, then put them in a zipped lock bags with relevant card and papers. This way I always have something ready to do when I go crafting either at weekend retreats or 12hr crop days. Quite often though I will find a piece of paper that I love but have nothing to match it with, so I have to put my thinking cap on and come up with a way to do a double page LO with one piece of paper and cardstock. This one I have used a punch to create a border using card stock and then used both sides of the paper.
I used some plastic slices as templates for this next LO.
Another layout using one piece of paper, I've used hessian that I'm spritzed with glimmer mist as my mounting and I fussy cut the butterfly's for embellishments.
For this next page I have used an EK punch for the side borders and raised them up in front of the blue card stripes to look like the wooden carving in the photo.
This next LO has only one piece of paper but by using different cardstocks it looks more complicated. I used the photos of my family as the main focal point but added the other view photos to get as much information on one LO.
Another paper that jumped out and shouted Portugal to me. I have used 2 pieces and cut them along the squares in the pattern, added darker card stock behind it to make it stand out more. The cuts off were then used to make the exact same layout but in 8 x 8.
This LO has come from a sketch given to me by Lyn Buxton. Lyn runs a craft retreat twice a year here in New Plymouth. The LO is very effective, using very little but scraps.
This next page is made using a Kaisercraft paper, I felt it fitted the theme of Tudor times for the Tower of London photos. The pattern on the left has been embellished using glossy accents and the I have just added the lace and the velvet ribbon and flower.
This next LO was done from one single piece of paper. I liked both sides but didn't have anything to match it, So I carefully cut out some flowers from one side, cut the strip to go down the left side and then covered any gaps using the flowers.
In this LO I have been careful not to cover too much of the pattern around the edges and have just added a few pieces of card and stickers.
This LO of my son is inspired by a layout that I saw at the Brisbane Craft show in 2012, the original was done by Cathy Cafun. In mine I have used washi tape and the title is the actual label from the paper.
I love this next layout. It has NO paper. I wanted to create a layout of the Palatino with the photos in the correct places so you can get a feel of what it would be like if you were stood in the middle.
This next layout has beautiful paper and so I didn't want to cover it up. I have just rotated one piece to give an illusion.
This LO is done using scraps left over from another LO.
Another double LO using 2 card stock and one piece of paper.
For this next LO I have used some vellum to cover up people in the photos that are not relevant. (Strangers not people I don't like!). The ride was at Alton Towers and my family met up with Sues (Blog partner) family for a day and night during our holidays. This was amazing because we were both in England on holiday at the same time. The ride is called 13 and in the brochure its depicted as scary, spooky and has brambles everywhere. I tried to give the page that feel by fussy cutting the leaves and intertwine with black twine.
This page is ultra simple, again I didn't want to cover the main feature of the paper up,
I have used Viva stone and a mask to make the spots on this next LO. The cardstock I have used is beach which has a fleck in it.
This next double LO started life as a single, the right hand page was done in a class with Lyn Buxton and then I have made a second page to match using the leftovers in the pack.
This LO was inspired by a card that I did at Lyn's craft retreat, below it I have put the card so you can see.
2 LO's using a single sheet.
A simple LO using a punched border as the embellishments.
Another example of a frugal LO.
This LO is the same as one earlier in this blog. I have just used 4 photos and used scraps to embellish.
A photo bought at Alton Towers, in the front you can see my son and husband but in the background the photo shows the whole carriage and Sue and her family are also on the ride.
A very simple LO that I have done with a torn piece along the bottom to give the feel of age.


